Pokazywanie postów oznaczonych etykietą zdobienie - nail art. Pokaż wszystkie posty

niedziela, 9 lutego 2020

niezimowe węże | non-wintery snakes

dziś chciałabym Wam pokazać zdobienie, które zdecydowanie nie jest zimowe, ale właściwie zupełnie o nim zapomniałam. to węże w nieco tropikalnym albo pustynnym (?) klimacie, które zrobiłam i nosiłam jak jeszcze było ciepło (tak, to było dość dawno temu :P). jest to też jeszcze jedno zdobienie, do którego użyłam jednego z lakierów z letniej kolekcji orly (Euphoria) - błękitnego "on your wavelength".
na błękitnej bazie odbiłam stemple z płytki born pretty store BP-A04 Passionate Desert, używając złotego lakieru do stempli born pretty "in fire" i czarnego z B. loves plates. niektóre węże pokolorowałam na stemplu (reverse stamping) i przeniosłam na paznokcie, a później na całość nałożyłam top z glisten & glow. i to tyle :)

today I'd like to show you some nail art which definitely is not a wintery one, but I actually forgot about it a bit, so here it is. snakes in kind with tropical or desertish (?) vibes, which I did when was warm outside (I know, it was a really long time ago :P). it's also one more nail art when I used one of orly's Euphoria polishes - baby blue "on your wavelength".
on this blue base I stamped snakes and leaves from born pretty stamping plate born pretty stamping plate BP-A04 Passionate Desert, using gold born pretty stamping polish "in fire" and black one from B. loves plates. I coloured some of the snakes on stamper (reverse stamping method) and then I transferred them onto nails and in the end I applied glisten & glow top coat. and that's it :)


orly - nail defense, 2 warstwy orly - on your wavelength, stemple, top glisten & glow hk girl
orly - nail defense, 2 coats of orly - on your wavelength, stamping, glisten & glow hk girl top coat

środa, 5 lutego 2020

spiralki drag marble | drag marble swirls

pora na kolejne zdobienie z wykorzystaniem lakerów orly z kolekcji Euphoria. tym razem postawiłam na metodę drag marble, czyli łączenie lakierów, gdy jeszcze są mokre przez rysowanie po ich powierzchni narzędziem z cienką końcówką. ja użyłam w tym celu maleńkiej sondy. i połączyłam w ten sposób dwa kolory, rysując na nich wzór spirali.
dajcie znać, jak Wam się podoba taki efekt :)

it's time to show you my next nail art with orly's Euphoria polishes. this time I used drag marble technique, which is mixing colors by draging something thin and sharp over their surface - whle they are still wet. I used tiny dotting tool for that and created swirls on all my nails.
let me know how do you like this effect :)


orly - nail defense, 2 warstwy orly - it's Britney, beach, 2 warstwy orly - muy caliente, top glisten & glow hk girl
orly - nail defense, 2 coats of orly - it's Britney, beach, 2 coats of orly -  muy caliente, glisten & glow hk girl top coat


niedziela, 2 lutego 2020

śnieżynki letnimi lakierami | snowflakes nail art with summer polishes

choć Euphoria od orly to kolekcja letnia, postanowiłam stworzyć z nią jakieś zimowe zdobienie. trochę z racji tego, że pokazuję ją Wam dopiero teraz, a trochę dlatego, że gdyby nie ta czerwień, to ta kolekcja moim zdaniem równie dobrze mogłaby być kolekcją zimową. kobalt i błękit jak dla mnie są bardzo zimowe i stwierdziłam, że będą fajnie wyglądać w takim tematycznym zdobieniu.
ja ogólnie nie lubię zimy, zimna i śniegu, ale muszę powiedzieć, że od kiedy coś nam się tak pomieszało z tą pogodą, że tej zimy śnieg pojawił się tylko raz i to na jeden dzień, to jakoś tak zaczęłam za nim trochę tęsknić. stąd postanowiłam zrobić sobie śnieżynki chociaż na paznokciach.

do zrobienia tego zdobienia użyłam tylko dwóch lakierów orly: doing them I used only two orly polishes: 
"it's Britney, beach" i "on your wavelenght" - a także do stemplowania. śnieżynki są z płytki B loves plates - B.05 let it snow. a na końcu dodałam jeszcze matowy top. i gotowe!


although orly's Euphoria is a summer collection, I decided to create some winter nail art with it. partly because of that I'm showing you this collection this late and also because (if not the red), for me this collection could be a winter one as well. cobalt and blue are very wintery for me and I thought they would be perfect for a winter manicure.
I don't like winter, cold and snow in general, but I have to admit that since the weather is so crazy nowadays, that this winter I saw snow only once and it lasted only one day, I kind of started missing it. so I decided I'll do snowflakes, so they will be on my nails at least.

for doing them I used only two orly polishes: 
"it's Britney, beach" and "on your wavelenght" - also for stamping. snowflakes are from B loves plates - B.05 let it snow. in the end I applied matte top coat. and that's it!


orly - nail defense, 2 warstwy orly - it's Britney, beach, 2 warstwy orly - on your wavelenght, stemple, top glisten & glow hk girl, matujący top models own
orly - nail defense, 2 coats of orly - it's Britney, beach, 2 coats of orly - on your wavelenght, stamping, glisten & glow hk girl top coat, models own matte top coat

niedziela, 7 lipca 2019

Blogger Collaboration - the ocean (nail art)

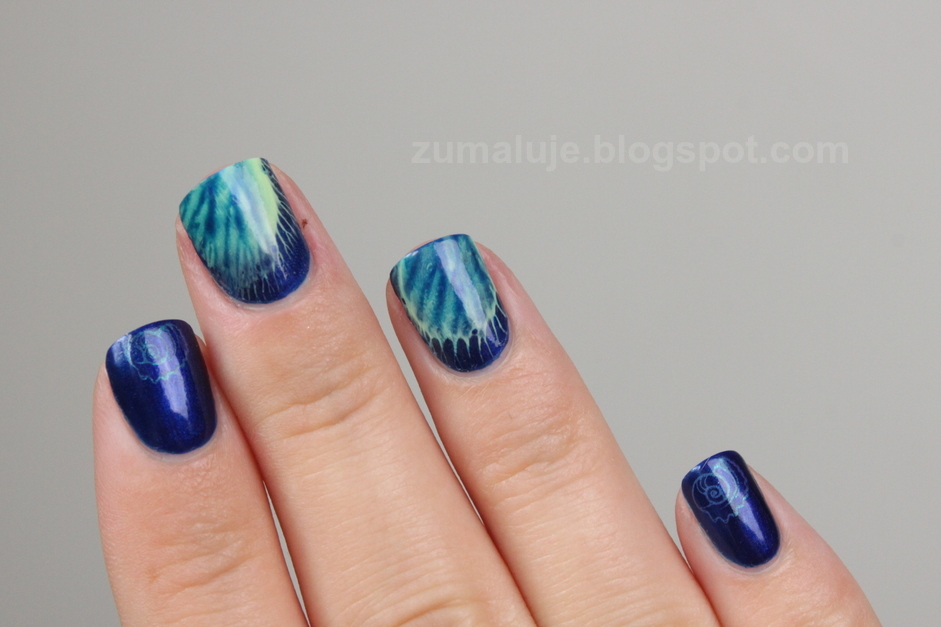
it's time for next blog post for blogger collaboration. this time it's today I'm gonna show you some sea nail art, which supossed to look like... lightnings :D I was inspired by nail_muse - I saw her nail arts on IG and they look exacty like lightnings! and my design... well, despite following tutorial, I ended up with something quite different on my nails - something which looked like coral reef or some other sea creatures ;) I tried many times and various colors combinations, but I just couldn't get this lightning effect. anyway, I liked the effect I achieved and this method of nail art.
and on some nails I added shell stamps from B loves plates stamping plate - B.11 summer paradise

how to do such nail art? long story short: paint base rectangle on stamping mate, while everything is still wet, leave the drop of contrasting nail polish in the middle of rectangle (it will create big dot), then you can add another drop of other polish in the middle of your first dot (it can be also color of your base rectangle). then you press your stamper against it and pick it up and it's done. you just need to wait until your nail decals will be dry and you can transfer them onto nails.

przyszła pora na kolejnego posta w ramach blogerskiego projektu, więc dziś pokażę Wam morskie zdobienie, które miało wyglądać jak... błyskawice :D do stworzenia go zainspirowały mnie zdobienia nail_muse, które widziałam na instagramie. jej zdobienia przypominały właśnie błyskawice i bardzo chciałam je odtworzyć, jednak mimo robienia wszystkiego zgodnie z tutorialem, hm, efekt końcowy zdecydowanie bardziej wyglądał u mnie jak rafa lub inne morskie stworzenia ;) za nic nie mogłam zrobić w ten sposób błyskawic, ale ogólnie bardzo dobrze nosiło mi się te paznokcie i bardzo spodobał mi się ten sposób zdobienia.
dodatkowo na niektórych paznokciach dodałam stemple muszelek z płytki B loves plates - B.11 summer paradise

a jak zrobić takie zdobienie? w dużym uproszczeniu: namalować bazowy prostokąt lakierem na macie do stemplowania, na środku tego zrobić kropkę innym kontrastującym lakierem i można w jej środku zrobić jeszcze jedną kropkę innym kolorem (może być taki jak kolor bazowy). następnie przyciskamy do tego stempel, podnosimy go i gotowe. czekamy aż naklejki wyschną i przenosimy je na paznokcie.
and here is the list of girls who participate in our blogger collaboration:
i lista dziewczyn, które biorą udział w naszym blogerskim projekcie:


Related Posts Plugin for WordPress, Blogger...